Wednesday, December 28, 2011

Initializing Arrays in Java

In Java, arrays can hold two types of data: primitive types (as in byte, short, int, char, etc) and reference types (Object, String, etc).

The main difference between them is that for an array holding elements of a primitive type it is not mandatory to initialize each element. On the other hand, in an object array every element needs to be initialized using the new operator because every element from an object array is be default initialized with null.

A few things about arrays:
  • Also one must note that arrays in Java are zero-based (the first element is at the 0th position)
  • Attempting to access an array with an index less than 0 or greater than the length of the array causes an ArrayIndexOutOfBoundsException to be thrown at runtime.
  • Arrays must be indexed by int values or byte, short or char values (as these can be promoted to int). Using a long index value to access an array may cause a compile error.
  • Arrays are created at runtime so one could easily use a variable to to set the size of the array.
An array can be declared and initialized in the following ways:
//Allocates memory for the array
//Since it's int, all values are by default 0
int[] myInts = new int[3];
//Initializes the array elements
myInts[0] = 1;
myInts[1] = 2;
myInts[2] = 3;
or, if you know the values at compile time and want a shorter form:
int[] myOtherInts = {1,2,3};
Let us suppose you have an simple class like:
public class Person 
{
   private String name;
   private int age;
    
   public Person(String name, int age)
   {
       this.name = name;
       this.age = age;
   }
   
   public String toString()
   {
    return this.name + " " + this.age;
   }
}
If you would like to create an array of Person, you could declare it and initialize it as:
//Allocates memory for the array
Person[] myPersons = new Person[3];
//Creates each object
myPersons[0] = new Person("John", 23);
myPersons[1] = new Person("Johnny", 24);
myPersons[2] = new Person("Mike", 25);
or, if you know the values at compile time and want a shorter form:
Person[] myOtherPersons = {
        new Person("John", 23),
        new Person("Johnny", 24),
        new Person("Mike", 25)
     };
It is very important to remember that when you use arrays of objects (reference types) you must allocate memory for each element of the array since every element is initialized by default with null. As you probably may know, if you try to access an object who has a null value, a NullPointerException will thrown. 

An array can also be initialized according to another array or it can be filled automatically with a specific element:
//Copies from source-array myOtherPersons starting from the 0th position 3 
//elements to the destination-array myCopyiedPersons1 starting with the 
//0th position
//Note: myCopyiedPersons1 needs to allocated
Person[] myCopyiedPersons1 = new Person[3];
System.arraycopy(myOtherPersons, 0, myCopyiedPersons1, 0, 3);
  
//Copies from source-array myOtherPersons the first 3 elements to the 
//destination-array myCopyiedPersons2 
//Note: myCopyiedPersons2 doesn't need to be allocated.
Person[] myCopyiedPersons2 = null;
myCopyiedPersons2 = Arrays.copyOf(myOtherPersons, 3);
  
//Copies from source-array myOtherPersons the elements between the indexes 1 
//and 3 (not including 3) to destination-array myCopyiedPersons3. 
//In myCopyiedPersons3 the element at the 0th position will be equivalent 
//to the element at the 1th (starting index) from myOtherPersons.
//Note: myCopyiedPersons3 doesn't need to be allocated.
Person[] myCopyiedPersons3 = null;
myCopyiedPersons3 = Arrays.copyOfRange(myOtherPersons, 1, 3);
  
  
//Makes all elements of the array myCopyiedPersons4 between the indexes 0 
//and 3 (not including 3) to be equal with a certain specified object
//Note: myCopyiedPersons4 needs to allocated
Person[] myCopyiedPersons4 = new Person[3];
Arrays.fill(myCopyiedPersons4, 0, 3, new Person("John",23));

Friday, December 23, 2011

Specifying Command Line Arguments in Visual Studio 2010

In the real world, the user has the option of offering command-line arguments when starting an application. However, one may find useful when testing or debugging a program to automatically offer command-line arguments each time the application starts.

This can be done in Visual Studio 2010, by going to the project's properties either by right-clicking on your project and selecting the Properties item or by going to Project -> <name_of_your_project>'s Properties in the menu bar and then going to the Debug menu.
In Start Options, you will have a text box where you can input  (just like when starting the application from a console) the command line arguments. After saving your settings at each application start the program will receive the arguments you specified.

Changing the Startup Form for VB in Visual Studio 2010

Let us suppose that we have a simple VB project that contains two forms. The first form (who was created by default when you created the project) is called StartForm and the second form (created by you) is called AnotherStartForm.
When you start your application, you will observe that your start-up form will be StartForm. To change that you need to go in the project properties (either by right-clicking on your project and selecting the Properties item or by going to Project -> <name_of_your_project> Properties in the menu bar).
After the project's properties page is opened you can modify the Startup form and choose another form like AnotherStartForm.

You can also modify here the actions the application's events and/or the shutdown mode of your application(choosing if the application will be closed when the last form is closed or when the startup form is closed).

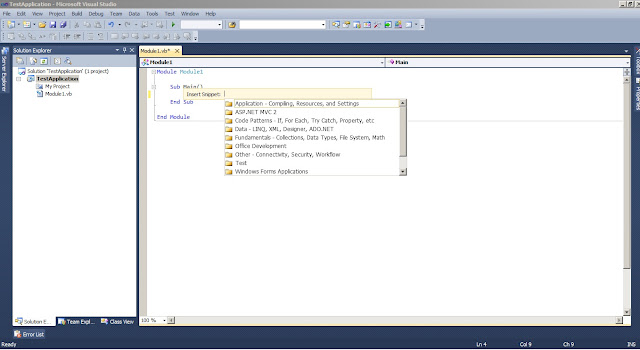
Inserting Code Snippets in Visual Studio 2010

Visual Studio's code snippets are a really nice utility that can help you write your code faster by automatically inserting various common code constructs like control flow constructs,  LINQ queries or interfaces.

You can insert a code snippet in three ways:
  1. By pressing CTRL+K followed by CTRL+X
  2. By right-clicking at the position where you want your code snippet inserted and choosing the option "Insert Code Snippet"
  3. By going to the "Edit" menu, choosing the "Intellisense" option and then "Insert Code Snippet" 
Inserting a code snippet using method 2
Inserting a code snippet using method 3
In practice, you will observe that the fastest method for inserting is method 1 (especially if you write C# code).

After you started the insertion you simply navigate through the menu using TAB until you find the snippet
you want.


Sunday, December 18, 2011

Wrapper Classes in Java

Java has for each primitive type a corresponding class that can be used to create objects according to the primitive type's value. These are called wrapper classes. In the table below, you can see the correspondence each primitive type and its wrapper class:

Primitive data type
Wrapper class
byte
Byte
short
Short
int
Integer
long
long
float
Float
double
Double
boolean
Boolean
char
Character

To create a wrapper class, one can use four methods.
  Byte b1 = new Byte("15");        //String constructor
  Byte b2 = new Byte((byte) 15);   //byte constructor
  Byte b3 = (byte)15;              //automatic cast, returns a byte type
  Byte b4 = Byte.parseByte("15");  //automatic cast, return a byte type
  Byte b5 = Byte.valueOf((byte)15);//returns a Byte type (wrapper)
  Byte b6 = Byte.valueOf("15");    //return a Byte type (wrapper)
The first method is by using a String as a parameter where the constructor will try to parse the data. If the String does not contain a valid number, a NumberFormatException will be thrown. The second method is by using a byte value as an argument for the constructor.

The third and fourth methods were made available starting with JDK 1.5 (that permitted automatic boxing/unboxing a.k.a automatic conversions from the primitive type to the wrapper type) and are similar with the first and second method. They return a byte type (primitive).

The fifth and sixth methods are very similar to the third and forth with the exception that they return a Byte type (wrapper). They were mostly used with older JDKs (before 1.5), but aren't considered deprecated.

In the example above I used byte's wrapper class for exemplification (Byte). The methods explained above can be used with all wrapper classes by changing the arguments and type-casts.

Also, all wrapper classes have methods that allow conversion to most of the other primitive types through the methods: byteValue(), shortValue(), intValue(), longValue, floatValue(), doubleValue(). If you have read this carefully, you may had observed that there is no booleanValue() or charValue() method. In languages like C or C++ the true value and the false value were associated with the numeric values 1 respectively 0. Simply put, Java doesn't do that.
  Double d = new Double(23.94);
  System.out.println(d.intValue()   + "\n"  + 
         d.byteValue()  + "\n"  +
         d.floatValue() + "\n"  +
         d.longValue()  + "\n"  +
         d.shortValue() + "\n"  
         );
  //Output
  //23
  //23
  //23.94
  //23
  //23
As you can see in the example above, a real number (in our case a double) is converted to an integer value by truncating the digits after the decimal point (it does not approximate 23.94 to 24). Still, there is a pitfall with these conversions:
  Double d = new Double(8.5e110);
  System.out.println(d.intValue()   + "\n"  + 
         d.byteValue()  + "\n"  +
         d.floatValue() + "\n"  +
         d.longValue()  + "\n"  +
         d.shortValue() + "\n"  
         );
  //Output
  //2147483647
  //-1
  //Infinity
  //9223372036854775807
  //-1
As you can see, a really large real number is not converted correctly, so be careful when using it. Also this applies to really small numbers (as module not negative).

To obtain the value that the wrapper class contains as a string, you simply need to call the toString() method.
  Double d = new Double(8.5e110);
  String s = d.toString();
  //s = "8.5E110"
To compare two wrapper objects one must use the equals() method. For comparing a wrapper class to a valid (as in terms of correspondence) primitive type the == operator could be used  (using automatic unboxing made available after JDK 1.5).
 Double d1 = new Double(5.10);
  Double d2 = new Double(5.10);
  double d3 = 5.10;
  if(d1.equals(d2))
   System.out.println("True");
  else
   System.out.println("False");
  if(d1==d3)
   System.out.println("True");
  else
   System.out.println("False");
  //Output
  //True
  //True
Also, one must note that is incorrect to compare two reference types (in our case objects of the class Double) using the == operators. This operator compares the memory addresses in this case and not the content of the wrapper.

The Double and Float wrapper classes also provide methods like isNaN(double) or isInfinite(double) that allow you to verify if a variable is valid (is not the result of 0/0) or if it is finite (is not the result of x/0, where x can be any number except 0).
if(Double.isInfinite(d1))
  System.out.println("The value is not a number!");
else
  System.out.println("The value is a number");
if(Double.isInfinite(d2))
  System.out.println("The value is infinite!");
else
  System.out.println("The value is finite");
Wrapper classes also provide methods for base conversionIEE754 representation,  determining the size of a type (in bytes) and the minimum/maximum values that a type could take, etc.

Initializing Constants in Java

Java doesn't use the const keyword for declaring constants (like C, C++ or C#). Instead, it uses the final keyword, which in combination with the static keyword (or not as you will see below) can provide you a constant variable (which is a bit of an oxymoron, but we'll take it as it is).

If a final variable is not static, it can be initialized either by using static initialization or an assignment statement inside the constructor. If the variable is static, it can only be initialized by using static initialization. A non-static final variable who is being initialized in the constructor is called a blank variable (or blank constant).

To understand this better, check out the example below:
public class ConstantTestClass 
{
 private final int myFinalData;    //Blank constant
 private final static int myStaticAndFinalData = 4; //Static initialization
 
 public ConstantTestClass()
 {
  myFinalData = 3; //Constructor initialization of constant
 }
 
 public static void main(String args[])
 {
  ConstantTestClass ctc = new ConstantTestClass();
  System.out.println(ctc.myFinalData +"\n" 
    + ConstantTestClass.myStaticAndFinalData);
 }
 //Output:
 //3
 //4
}
The code snippet above will not trigger any error when compiled (since it's legal to initialize a final "variable" inside a constructor if the variable is not static). At compilation, the class would trigger an error if the final variable wouldn't be initialized by the constructor.

The beauty of the initialization inside of the constructor is that you can initialize your non-static constant with a value that you do not know at compile-time. See the example below for better understanding:
public class ConstantTestClass 
{
 private final int myFinalData;      //Blank constant
 private final static int myStaticAndFinalData = 4; //Static initialization
 
 public ConstantTestClass(int x,int y)
 {
  myFinalData = x+y; //Constructor initialization of constant
 }
 
 public static void main(String args[])
 {
  int x = (int)Math.sqrt(1);   //Unknown value at compile time
  int y = (int)(Math.PI - 1);  //Unknown value at compile time
  ConstantTestClass ctc = new ConstantTestClass(x,y);
  System.out.println(ctc.myFinalData +"\n" 
         + ConstantTestClass.myStaticAndFinalData);
 }
 //Output:
 //3
 //4
}
Also, we could initialize myFinalData using a static initializer and obtain the same results as in the first example. The only disadvantage is that you must know at compile-time the value that should be assigned to your constant. 
public class ConstantTestClass 
{
 private final int myFinalData = 3; //Static initialization  
 private final static int myStaticAndFinalData = 4; //Static initialization
 
 public ConstantTestClass(){}
 
 public static void main(String args[])
 {
  ConstantTestClass ctc = new ConstantTestClass();
  System.out.println(ctc.myFinalData +"\n" 
    + ConstantTestClass.myStaticAndFinalData);
 }
 //Output:
 //3
 //4
}
Also, one must note that if your constant is applicable to all object of your class you should probably make it static in most cases.

Sunday, December 4, 2011

Simple Calculator Applet

Since I've been playing the last few days with Java applets, I decided to create a simple calculator. In the right you can see the result.

How the applet works:
  1. User inputs one or two values (depending of what operations he needs to be done)
  2. The user selects the operation by clicking of the central buttons.
  3. The result appears in the result TextField and the bottom list.
What it can do for now:
  • v1.01
    • The result text box is no longer editable
    • Better log (it now shows which operations were made)
    • The ability to reload automatically operators by clicking a log entry
  • v1.00
    • Basic arithmetic operations (addition, subtraction, multiplication, division, modulo, power, square root, natural logarithm)
    • Trigonometric functions
    • Saving the results in a list

Solving Eclipse Update Problem on Linux

If you just installed Eclipse and want to update it (HELP ->CHECK FOR UPDATES), you may encounter the following problem:
This error will happen if you installed Eclipse using package managers like Ubuntu Software Center or the Synaptics Package Manger. This happens because Eclipse will be installed in a secured location where its contents can only be modified with the root's permission.

To solve this problem you need to start Eclipse as root. To do this, you simply must open a terminal and type:
sudo Eclipse
After you inputted the root password (if you don't know it, check with the administrator), this will start Eclipse as root and will allow you to get the much needed updates (by going to HELP->CHECK FOR UPDATES).
Related Posts Plugin for WordPress, Blogger...