Showing posts with label Visual Studio. Show all posts

Thursday, January 5, 2012

Language Compile Options for the VB.NET Compiler

There are four language compile option for VB.NET:

/optioncompare
This option declares the default comparison method used when comparing string data. There are two choices: binary and text

If the binary comparison method is chosen, the strings will be compared according to their binary representation. This method is the fastest, but may lead sometimes to some unwanted results if you use the Unicode set. This happens because the strings are compared character by character according to their Unicode value which would be something like:
A < B < E < Z < a < b < e < z < À < Ê < Ø < à < ê < ø
So, if you think that À should come after A and before B, you should not use the binary comparison method. Also binary comparison is case sensitive.

If the text comparison method is chosen, the strings will be compared according based on a case insensitive text sort order determined by the system's locale. This is something like:
(A=a) < (À = à) < (B=b) < (E=e) < (Ê = ê) < (Z=z) < (Ø = ø)
Console.Write("À" < "B")
'Output: True (when using Text Compare)
'Output: False (when using Binary Compare)
/optionexplicit
If this option is enabled all variables must be declared using the Dim or ReDim statements. If one tries to use an undeclared variable, an error will occur at compile time. If this option is disabled, one can use a variable without declaring it first using Dim or ReDim.
i = 3
Console.Write(i)
'Will trigger an error if Option Explicit is On
'Will not trigger an error if Option Explicit is Off
/optionstrict
When Option Strict is On, implict narrowing conversions, late binding and implicit typing that results to Object will cause a compile-time error. If Option Strict is Off, you will receive warnings or run-time errors instead of compile-time errors;
'Narrowing conversion example
Dim a As Long = 5
Dim b As Integer = a
'Option Strict On => Will cause error, can be corrected by
'Dim b As Integer = Ctype(a,Integer)
'Option Strict Off => Will raise a warning

'Late binding example
Dim text As Object
text = New Object
text = "abc"
'Option Strict On => Will cause compile error
'Option Strict Off => Will cause a runtime error

'Implicit typing that results to Object example
Dim x
'Option Strict On => Will cause compile error
'Option Strict Off => x will be equal to Nothing
/optioninfer
When Option Infer is On, the compiler will guess (infer) the type of an object if the type is unspecified according to a value assigned to it. When Option Infer is Off, the compiler will not try to guess the type of the object if you don't specify it and will cast it as Object. (if Option Strict is On this may cause compile-time errors because this is an implicit typing that results to Object).
<
Dim number = 3
Dim text = "abc"
Dim letter = "c"c
Dim real = Math.PI
'If Option Infer is On
'number will be of type int
'text will be of type string
'letter will be of type char
'real will be of type double
'If Option Infer is Off
'number,text,letter,real will be considered as Object
To set the compile options directly from Visual Studio, one must go to the project's properties (either by right-clicking on your project and selecting the Properties item or by going toProject -> <name_of_your_project> Properties in the menu bar) and then to the compile panel.
In command line, you simply need to specify the options as arguments to the compiler:
Alternatively you can specify this options directly into the code. Using them this way, the new options will overwrite the old options specified as compiler arguments (or set in Visual Studio).
Option Strict Off
Option Infer On
Option Explicit Off
Option Compare Binary
Module Program
    Public Sub Main(ByVal args As String())
        Console.Write("Hello compiler world!")
    End Sub
End Module

Friday, December 23, 2011

Specifying Command Line Arguments in Visual Studio 2010

In the real world, the user has the option of offering command-line arguments when starting an application. However, one may find useful when testing or debugging a program to automatically offer command-line arguments each time the application starts.

This can be done in Visual Studio 2010, by going to the project's properties either by right-clicking on your project and selecting the Properties item or by going to Project -> <name_of_your_project>'s Properties in the menu bar and then going to the Debug menu.
In Start Options, you will have a text box where you can input  (just like when starting the application from a console) the command line arguments. After saving your settings at each application start the program will receive the arguments you specified.

Changing the Startup Form for VB in Visual Studio 2010

Let us suppose that we have a simple VB project that contains two forms. The first form (who was created by default when you created the project) is called StartForm and the second form (created by you) is called AnotherStartForm.
When you start your application, you will observe that your start-up form will be StartForm. To change that you need to go in the project properties (either by right-clicking on your project and selecting the Properties item or by going to Project -> <name_of_your_project> Properties in the menu bar).
After the project's properties page is opened you can modify the Startup form and choose another form like AnotherStartForm.

You can also modify here the actions the application's events and/or the shutdown mode of your application(choosing if the application will be closed when the last form is closed or when the startup form is closed).

Inserting Code Snippets in Visual Studio 2010

Visual Studio's code snippets are a really nice utility that can help you write your code faster by automatically inserting various common code constructs like control flow constructs,  LINQ queries or interfaces.

You can insert a code snippet in three ways:
  1. By pressing CTRL+K followed by CTRL+X
  2. By right-clicking at the position where you want your code snippet inserted and choosing the option "Insert Code Snippet"
  3. By going to the "Edit" menu, choosing the "Intellisense" option and then "Insert Code Snippet" 
Inserting a code snippet using method 2
Inserting a code snippet using method 3
In practice, you will observe that the fastest method for inserting is method 1 (especially if you write C# code).

After you started the insertion you simply navigate through the menu using TAB until you find the snippet
you want.


Saturday, August 20, 2011

Creating a LINQ TO SQL Model for a SQL CE Database

Right now, Visual Studio 2010 cannot create directly a .dbml model (LINQ to SQL) from .sdf file (SQL Server CE). If you try to create a model and drag & drop a table, Visual Studio will give you an error and say that this feature isn't supported.

By default, you cannot use a dbml model for a SQL Server CE database.

Still, the model can be created by using the application SqlMetal.

The application can be found in the directory (supposing that you have Windows installed on the C: partition).

[Windows x64] C:\Program Files (x86)\Microsoft SDKs\Windows\v7.0A\Bin
[Windows x86] C:\Program Files\Microsoft SDKs\Windows\v7.0A\Bin

1)Open Command Prompt (Start->Run->enter cmd in textbox).
2)Once the console (Command Prompt) is opened, write:

SqlMetal /dbml:Database.dbml Database.sdf
Database.dbml must be replaced with the path to the location where you want to generate the dbml model.
Database.sdf must be replaced with the path to the location of the database (the sdf file).

3)The generated file will contain the database map (the database model). To use the model in Visual Studio, you must attach it to your current project.

Thursday, August 18, 2011

Creating and Populating a Local Database in Visual Studio 2010 using Microsoft SQL Server CE

1) Create a new project (File->New Project->Visual C# (or Visual Basic) ->Windows Form Application) or open an already created .NET project.

2) Create a local database: Data - Add New Data Source.
Adding a new data source
3) Choose Database and press Next.
Selecting a database
4) Now you are presented two options: Dataset and Entity Data Model.

If you choose the Dataset options, you will have to create a BindingSource object and a Dataset object to access the database in your program. In terms of performance, the Dataset is better than the Entity DataModel.

If you choose and Entity Data Model, the tables and records will be mapped as classes and objects and you will be able manipulate them more easily. In terms of rapid development, a Entity Data Model is better than a Dataset.

In this example we shall choose to access our data through a Dataset.
Dataset vs Entity Data Model
4) In your new window choose New Connection. You will be presented with several options for configuring the connection to your database.
Configuring the connection
5) Click the Change button. Now you will be presented with a selection of several databases type (Access, Oracle, SQL Server, etc). To use a local SQL Server, select the option SQL Server Compact 3.5 option.
Selecting a SQL Server Compact 3.5 database
6) Now you will observe that the layout of your window changed a little bit. Now you can choose to create a new database or provide the location of an already created database. In this tutorial we shall create a new database by pressing the button Create.
Configuring the database
7)Now you must provide a path for your database. You can also choose to encrypt your database by providing a password or change the database's character set (so you could use locale-specific characters).
Creating the database
8)After you created the database, it is generally good practice to test if you can connect to it. This can be done by pressing the button Test Connection. If you done the things right, you will receive a message like the one bellow.After the test press OK again to advance to the next dialog.
Testing the connection
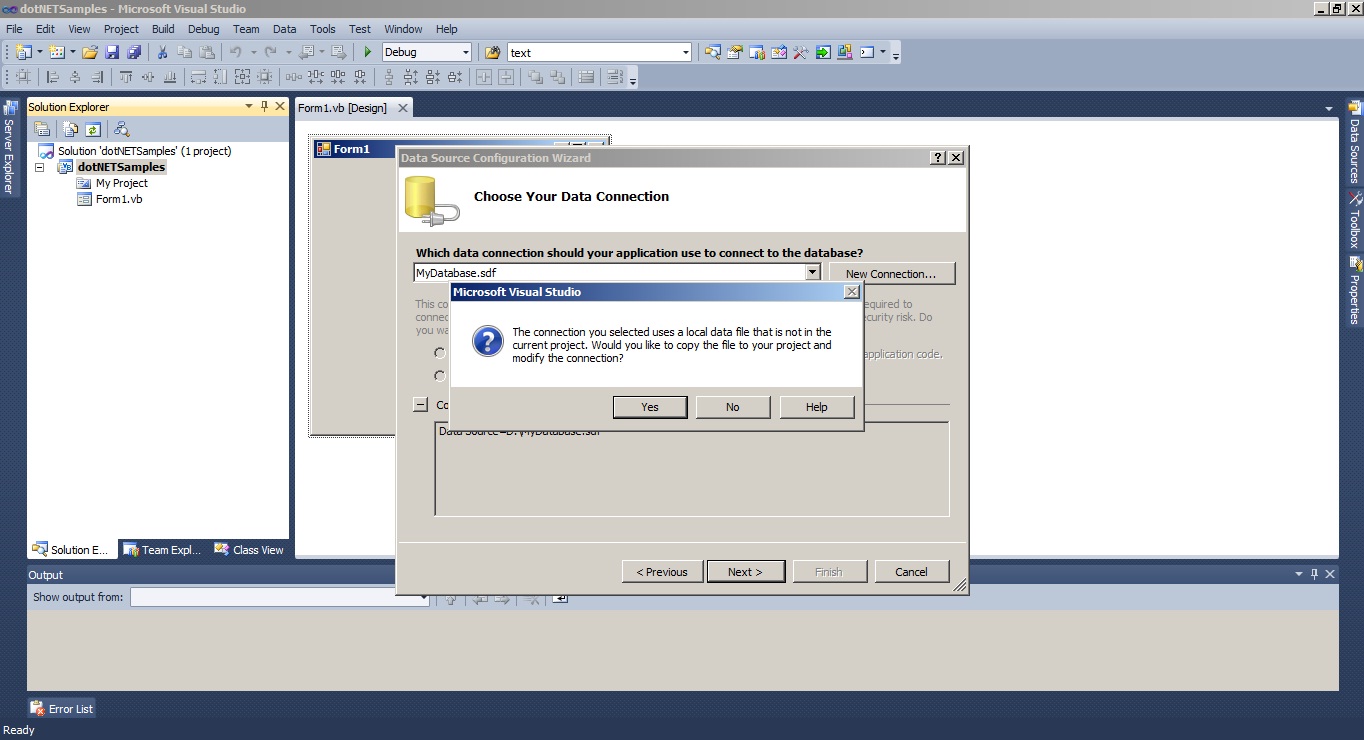
9)In the new window, you can see your connection string in the bottom textbox. Press Next to proceed. Now you will be asked if you want to copy your database file into the current project.

If you choose Yes, your database will appear in Solution Explorer, but any changes you do to the database (like inserting, updating or deleting records), will be lost when you close your application. This happens because every time you run your application a copy of the database will be made in the Debug/Release folder who contains your executable, a copy who will be lost when you close and restart your application. You can modify your database by using Visual Studio's tools, but not your application. This is a good thing if you want to distribute your database along with your application and will protect the database from bugs in your software. 

If you want to modify the database using your application and keep the changes choose No.
Choosing if the database will be added to the project
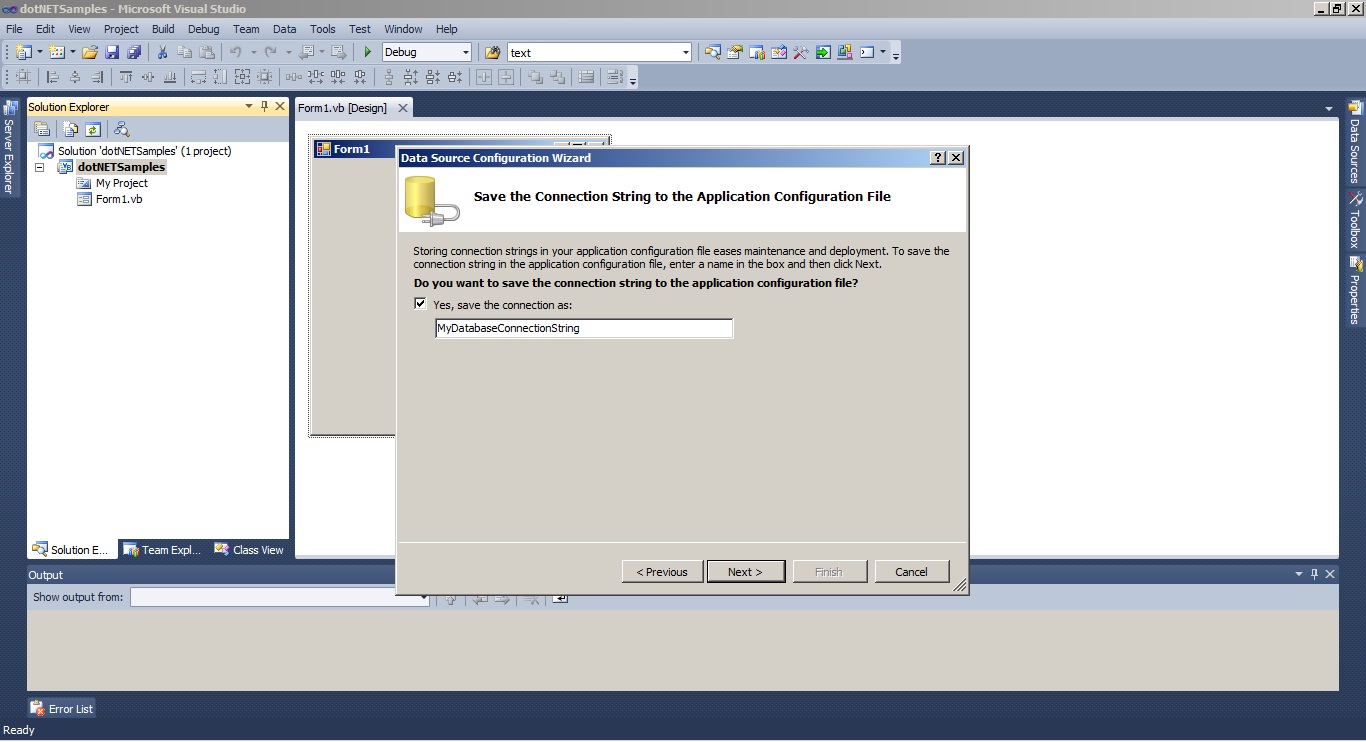
10)After doing this you will be asked if you want to save your Connection String to the application configuration file. Check Yes and press Next.
Saving the connection string
11)Now you will receive a message that your database contains no objects. This is normal since it was just created. To the bottom you will see the name of your Dataset. This dataset will be added to the Solution explorer. Press Finish.
Saving your database and its dataset
12)Now that you created your database its time to add some tables and some record. To do that open the Server Explorer window (Ctrl + W, L). There you can see your database file. To create a table you simply need to right-click on it and select the option Create Table.
The Server Explorer perspective
13)Now you can give a name to the table and begin configuring the fields.
Creating a Table Schema
By repeating 12) and 13) you can create multiple tables.

14) In order to populate your table, right click on the newly created table and select the option Show Table Data. This will open a window where you can insert new records, modify the existing ones and even delete older records.
Populating the database
Related Posts Plugin for WordPress, Blogger...