Showing posts with label Visual Programming. Show all posts

Friday, December 23, 2011

Changing the Startup Form for VB in Visual Studio 2010

Let us suppose that we have a simple VB project that contains two forms. The first form (who was created by default when you created the project) is called StartForm and the second form (created by you) is called AnotherStartForm.
When you start your application, you will observe that your start-up form will be StartForm. To change that you need to go in the project properties (either by right-clicking on your project and selecting the Properties item or by going to Project -> <name_of_your_project> Properties in the menu bar).
After the project's properties page is opened you can modify the Startup form and choose another form like AnotherStartForm.

You can also modify here the actions the application's events and/or the shutdown mode of your application(choosing if the application will be closed when the last form is closed or when the startup form is closed).

Sunday, December 4, 2011

Simple Calculator Applet

Since I've been playing the last few days with Java applets, I decided to create a simple calculator. In the right you can see the result.

How the applet works:
  1. User inputs one or two values (depending of what operations he needs to be done)
  2. The user selects the operation by clicking of the central buttons.
  3. The result appears in the result TextField and the bottom list.
What it can do for now:
  • v1.01
    • The result text box is no longer editable
    • Better log (it now shows which operations were made)
    • The ability to reload automatically operators by clicking a log entry
  • v1.00
    • Basic arithmetic operations (addition, subtraction, multiplication, division, modulo, power, square root, natural logarithm)
    • Trigonometric functions
    • Saving the results in a list

Friday, October 28, 2011

Loading and Saving an Image in VB .NET

First we shall consider a form that contains two buttons: one button for opening an image(BUTOpen) and one button for saving an image (BUTSave) and a PictureBox control for showing the opened image. The form should look like this:
This form should also have an OnLoad event to initialize a bitmap object (which should hold your image):
Public Class ImgForm

    Private myBitmap As Bitmap

    Private Sub Form1_Load(ByVal sender As System.Object, ByVal e As System.EventArgs) Handles MyBase.Load
        myBitmap = New Bitmap(PictureBox1.Height, PictureBox1.Width)
    End Sub

End Class
1.Loading an image

To load an image you will need to specify its filename. In most of the cases (especially when you need your user to specify which image to load), it's recommended to use the .NET OpenFileDialog class. This dialog allows the user to browse his computer in search for the image he wants to load. Also, you can specify filters, so the dialog will not show irrelevant files. All this can be put in a click event for the button BUTOpen.
   Private Sub BUTOpen_Click(ByVal sender As System.Object, ByVal e As System.EventArgs) Handles BUTOpen.Click
        Dim open As New OpenFileDialog
        open.Filter = "JPG files (*.jpg)|*.jpg|Bitmaps (*.bmp)|*.bmp|Gif(*.gif)|*.gif"
        If (open.ShowDialog = DialogResult.OK) Then
            myBitmap = System.Drawing.Image.FromFile(open.FileName)
            PictureBox1.Image = myBitmap
        End If
    End Sub
2.Saving an image

After you've ended modifying your image (see Drawing Lines, Shapes and Text in VB.NET), you may want to save it on your hard-disk. To do that you just need to specify the path where your image should be saved. Like I said before, if you want the user to select the location it's recommended to use a dialog. In this case, your best choice would be the inbuilt SaveFileDialog class (which is, in fact, very similar to the OpenFileDialog.). All this can be put in a click event for the button BUTSave.
    Private Sub BUTSave_Click(ByVal sender As System.Object, ByVal e As System.EventArgs) Handles BUTSave.Click
        Dim save As New SaveFileDialog
        save.Filter = "JPG files (*.jpg)|*.jpg|Bitmaps (*.bmp)|*.bmp|Gif(*.gif)|*.gif"
        If (save.ShowDialog = DialogResult.OK) Then
            myBitmap.Save(save.FileName)
        End If
    End Sub

Saturday, October 22, 2011

Drawing Lines, Shapes and Text in VB. NET

.NET has inbuilt methods for drawing graphics for your program. In order to use them you will need to instantiate a Graphics object. This object can be used do draw shapes and lines anywhere in your form, but in most cases you will prefer to use a PictureBox control as your "drawing pad". Also, in order to initialize your graphics, you will need to use a Bitmap object.

After creating your form and adding the PictureBox, you need to create an OnLoad event (which will trigger when the form is created) and add the following instructions:
    'The Form is called Form1 and the PictureBox is called PictureBox1
    Private myGraphics As Graphics
    Private myBitmap As Bitmap

    Private Sub Form1_Load(ByVal sender As System.Object, ByVal e As System.EventArgs) Handles MyBase.Load
        myBitmap = New Bitmap(PictureBox1.Width, PictureBox1.Height)
        myGraphics = Graphics.FromImage(myBitmap)
    End Sub
Drawing a Line
To draw a line you need to specify a pen and two points that belong to that line. You can specify the points using the Point/PointF class or by providing the coordinates as Integers/Singles. After you made a graphical change, you will need to update the PictureBox's image (this is a most do for all graphical changes).
Example:
        myGraphics.DrawLine(New Pen(Color.Black),
                            New Point(10, 20),
                            New Point(15, 30))
        PictureBox1.Image = myBitmap
Drawing a Rectangle
To draw a rectangle you will need to specify a Pen, the coordinates of the upper-leftmost vertex, the width and the height of your Rectangle.
Example:
        myGraphics.DrawRectangle(New Pen(Color.Black), 10, 20, 30, 50)
        PictureBox1.Image = myBitmap
Drawing an Arc
To draw an arc you will need to specify a Pen, a Rectangle area to contain the arc, the start angle and the end angle (which are specified in degrees))
Example:
        myGraphics.DrawArc(New Pen(Color.Black),
                           New Rectangle(10, 20, 30, 50), 23.5, 90.5)
        PictureBox1.Image = myBitmap
Drawing a Bezier Spline
To draw a Bezier spline you will need to specify a Pen, a starting point, two control points and an ending point. The points can be specified either by using the Point/PointF class or by inputting the coordinates for each point specifically as Integers/Singles.
Example:
        myGraphics.DrawBezier(New Pen(Color.Black),
                              New Point(20, 30), New Point(50, 80),
                              New Point(12, 30), New Point(40, 30))
Drawing an Ellipse 
To draw an ellipse you will need to specify a Pen and a rectangle area which will contain your ellipse.
Example:
       myGraphics.DrawEllipse(New Pen(Color.Black), 
       New Rectangle(100, 100, 100, 100))
       PictureBox1.Image = myBitmap
Drawing a Pie Slice
To draw a pie slice (a section from an ellipse) you will need to specify a Pen, a rectangle area to contain the pie (the entire pie), the start angle and the end angle of the section (in degrees).
Example:
       myGraphics.DrawPie(New Pen(Color.Red), 
       New Rectangle(100, 100, 100, 100), 
       -32.0, -48)
       PictureBox1.Image = myBitmap
Drawing a Polygon
To draw a polygon you will need to specify a Pen and a point vector that symbolize the polygon's vertices.
Example:
        Dim pointArray(0 To 3) As Point
        pointArray(0) = New Point(20, 30)
        pointArray(1) = New Point(40, 50)
        pointArray(2) = New Point(80, 90)
        pointArray(3) = New Point(40, 80)
        myGraphics.DrawPolygon(New Pen(Color.BlueViolet), pointArray)
Drawing Curves/Shapes
To draw a curve/shape you will need to specify a Pen and a point vector who will contain a number of points who belong to the curve. The method is based on an interpolation algorithm which tries to approximate the missing points coordinates that stand between the points you specify (the accuracy of the drawing depends on how many points you offer).
Example:
        Dim pointArray(0 To 3) As Point
        pointArray(0) = New Point(20, 30)
        pointArray(1) = New Point(40, 50)
        pointArray(2) = New Point(80, 90)
        pointArray(3) = New Point(40, 80)
        'Drawing a closed curve(shape)
        myGraphics.DrawClosedCurve(New Pen(Color.Blue), pointArray)
        'Drawing an open curve(does not interpolate the first and last point)
        myGraphics.DrawCurve(New Pen(Color.Red), pointArray)
        PictureBox1.Image = myBitmap
Drawing Text
To draw text you will need to specify the text which will be written as a String, the Font which will be used to render the text, a Brush and the point at which the drawing will start.
Example
       myGraphics.DrawString("TEXT TO BE WRITTEN", 
                             New Font("Times New Roman", 13),
                             New SolidBrush(Color.Red), New Point(80, 80))
       PictureBox1.Image = myBitmap
Tuesday, October 18, 2011

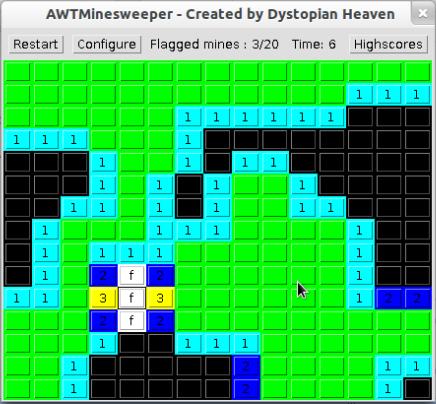
Minesweeper Clone in Java AWT

I created recently a Minesweeper clone in Java AWT as a project for one of my classes. The graphics are not great since I didn't bother to use icons or images for buttons, but the game is functional.

The screen shot bellow was taken under Linux:

Mouse Events in Java AWT

Let's consider the class we had in the article on how to close a frame in Java AWT. To use a mouse event we need to define another adapter class that will extend the MouseAdapter class. The MouseAdapter subclass will also be nested in the "main" class, since it's easier this way to access the members and methods of the "main" class (just like the CloseWindowAdapter class in the previous example).
import java.awt.Button;
import java.awt.FlowLayout;
import java.awt.Frame;
import java.awt.Label;
import java.awt.event.MouseAdapter;
import java.awt.event.MouseEvent;
import java.awt.event.WindowAdapter;
import java.awt.event.WindowEvent;

public class TestFrame1 extends Frame
{
    //This controls should be declared as internal variables
    //in order to be accessed by the nested classes
    private Button but;
    private Label lbl;
    
    private class CloseWindowAdapter extends WindowAdapter 
    {        
        public void windowClosing(WindowEvent we)
        {
            TestFrame1.this.setVisible(false);
            TestFrame1.this.dispose();
            System.exit(0);
        }
    }
    
    private class TestMouseAdapter extends MouseAdapter
    {
        public void mouseClicked(MouseEvent e) 
        {    
            //Checks if it's right click
            if(e.isMetaDown()==true)
                lbl.setText("RIGHT CLICK");
            //If it's not right-click, then it's left click
            else
                lbl.setText("LEFT CLICK");
        }
    }
    
    public TestFrame1()
    {
        super("Test frame");
        this.addWindowListener(new CloseWindowAdapter());
        this.setLayout(new FlowLayout());
        //Creating a button
        but = new Button("Trigger click event");
        //Adding the a mouse listener for the button
        but.addMouseListener(new TestMouseAdapter());
        //Creating a label to show what event will be triggered
        lbl = new Label("Nothing happened yet");
        //Adding the controls to the frame
        this.add(lbl);
        this.add(but);
        //Packing the frame
        this.pack();
    }
    
}
In the example above, the frame contains two controls : a button and a label. If you would right click the button, the label's text would become "RIGHT-CLICK". If you would left click the button, the label's text would become "LEFT-CLICK". The MouseEvent object can also provide several other checks:
 //Returns true if the ALT key was pressed at the time of the click
 e.isAltDown();
 //Returns true if the ALT GR key was pressed at the time of the click
 e.isAltGraphDown();
 //Returns true if the CTRL key was pressed at the time of the click
 e.isControlDown();
 //Returns true if the SHIFT key was pressed at the time of the click
 e.isShiftDown();
 //Returns a reference to the control who triggered the event
 e.getSource();
 //Returns a Point object containing the x,y coordinates 
 //relative to the source component
 e.getPoint();
The TestMouseAdapter subclass implements only the mouseClicked event trigger. The MouseAdapter ancestor class would had allowed the implementation of several other event triggers:
  • mouseEntered - occurs when the mouse cursor enters the component
  • mouseExited - occurs when the mouse cursor leaves the component
  • mousePressed - occurs when a mouse button is pressed on the component
  • mouseReleased - occurs when a mouse button is no longer pressed on the component 
The mouseClicked event trigger which we had used occurs when the component was clicked (pressed and then released).

Closing a Frame in Java AWT

To close a frame in AWT, you need to define a WindowAdapter object that will call the methods you want when the close button will be clicked. If it often beneficial to declare this new class as a nested type of the frame, since it could access the frame's methods and members.

To practically close the window, you must first make it invisible to the user and then free all the resources it occupies.
import java.awt.Frame;
import java.awt.Label;
import java.awt.event.WindowAdapter;
import java.awt.event.WindowEvent;

public class MyFrame extends Frame 
{
    public class CloseWindowEvent extends WindowAdapter 
    {        
        public void windowClosing(WindowEvent we)
        {
            //Make the frame invisible
            MyFrame.this.setVisible(false);
            //Free all resources
            MyFrame.this.dispose();
            //If you also want to close the program,uncomment bellow
            //System.exit(0);
        }
    }
    
    public MyFrame(String title)
    {
        super(title);
        this.add(new Label("Click X to Close"));
        //Adds the listener to the class
        this.addWindowListener(new CloseWindowEvent());
        this.pack();
    }
}
Related Posts Plugin for WordPress, Blogger...